Most people know the sanding is the technical bit. The finish is where they get caught out.
It usually goes like this. You pick a colour or a product because it looked great in a showroom, in a magazine or at a friend’s place. Then it goes down on your floor and it looks nothing like what you saw.
This happens all the time, and the reason is simple. No two timber floors are the same. The species, the age of the boards, the grain, the colour they already are and the light in the room all change how a finish looks. A grey oil that looks cool and stylish in a north-facing Fitzroy terrace can look flat and dull in a south-facing brick veneer in Moorabbin. Same stain. Different floor, different light, and a totally different result.
If you know what causes those differences, and you test before you commit the whole floor, you’ll end up with a floor you love. Not one you just put up with. Talk to experienced specialists in timber floor sanding Melbourne homeowners trust, who’ll look at your floor and your light before they suggest a finish. And have the colour chat before the sanding starts, not after.
Grey Floors Are Harder Than They Look
Grey and white-washed floors have been popular in Melbourne for years, and they’re not going anywhere. Done well, they look great. Done badly, they look patchy and blotchy, like the old colour is pushing up through the stain.
The catch is that getting a clean, even grey on solid timber takes a different process from a normal clear finish. Most of the floors hiding under carpet in Melbourne homes built between 1950 and 1990 are Australian hardwood. And Australian hardwoods tend to have warm undertones. Victorian Ash leans yellow. Spotted Gum has a lot of pink and brown in it. Blackbutt runs warm orange.
Put a grey stain straight over any of those and you won’t get the clean, cool grey you were after. You’ll get a muddy, greenish grey.
To get a proper grey or white-wash on Australian hardwood, the timber usually needs to be bleached first. This is sometimes done with a lime wash or a two-pack bleach system. It takes the warmth out of the timber before the grey goes on. It adds steps, and it adds cost. So some sanders skip it and go straight to the stain.
The floor looks fine the day they finish. Within a year, the warm undertone starts coming back through, and the colour slides towards mud.
So if a sander quotes you for a grey or white-washed finish, ask them how they’ll deal with the timber’s undertone. Their answer will tell you a lot about the result you’ll get.
Your Light Changes Everything
This is the part most people underestimate. It’s hard to picture, and it means thinking about your own home instead of looking at photos of someone else’s.
Melbourne’s light isn’t the same as Queensland’s. It’s not the same as the light in most flooring magazines either, which are often shot in homes in the northern hemisphere. Because Melbourne is so far south, the sun sits lower in the sky for more of the year. The light comes mostly from the north, and it has a different colour to tropical or subtropical light.
South-facing rooms in Melbourne get cool, soft light for most of the day. A light grey or pale oak finish will look a lot cooler and darker in a south-facing room than in a north-facing room that gets sun morning and afternoon. A warm honey oil can lift a south-facing room that feels a bit flat. Put the same oil in a north-facing room, though, and on a sunny afternoon it can tip over into orange.
East-facing rooms get warm morning light that cools off as the day goes on. West-facing rooms cop the harsh afternoon sun. Either way, the same finish in the same room will look different at 9am than it does at 4pm.
That’s why a finish that looks right in a showroom might not look right at home. Showrooms are usually lit with a mix of overhead lights and a bit of daylight. Your home isn’t. The only way to know for sure is to test the finish in your own space.
How to Test a Finish Properly
A lot of people test a finish by looking at a small sample board. It’s better than nothing. But it’s not as good as testing on your actual floor. The grain on the board is different, the sample is small, and you’re looking at it in different light.
A proper test means the sander puts the finish you’re thinking about on a patch of your real floor, in the real room. That could be a stain, an oil or a clear coat in the sheen you want. Put the patch somewhere you’ll see it, not behind the couch. Make it big enough to show how the colour looks across the grain, not just on one tight-grained board.
Then look at it at different times. Morning. Midday. Late afternoon. And at night under your own lights.
It takes a bit longer and costs a little more in product. It’s worth it. Finding out the finish looks wrong after it’s gone down over 80 square metres of Victorian Ash is an expensive lesson. Finding out on a half-metre test patch before the job starts is easy to fix.
Most good sanders will offer a test patch. If one pushes back on doing it, take note.
Gloss, Satin or Matte?
Sheen is how much the finish reflects light. It changes how the floor looks, and it changes how much everyday wear shows.
High gloss reflects the most. It looks amazing in photos. It also shows every bit of dust, every dog scratch and every footprint when the light hits it low. If you’ve got kids or pets, a gloss floor means cleaning every day. It looks perfect for about four hours after a good clean. Then real life takes over.
Satin is the most practical pick for most Melbourne homes. It has enough shine to show off the timber, but it doesn’t make every speck of dust and every scratch stand out. It looks polished without needing constant attention. That’s why it’s the most popular choice.
Low sheen and matte finishes have come a long way in the last few years. Modern water-based matte products are tough now, not the soft compromise they used to be. They suit modern homes going for a raw, natural look. They also hide wear better than gloss or satin, because they don’t bounce light off every mark. The trade-off is that they can look a little flat in darker rooms.
Sheen also changes how a colour looks. A grey floor in high gloss feels cool and formal. The same grey in matte feels relaxed and natural. Neither is wrong. They just suit different rooms and different ways of living.
Oil or Polyurethane?
Sanders get asked this all the time. The truth is that both can look great and both can look terrible. Prep and application matter more than the product.
There are real differences, though.
Polyurethane sits on top of the timber as a film, sealing it underneath. It stands up well to spills and water, and you can clean it with normal floor cleaners. When it wears, it tends to wear in paths. The busy walkways go dull while the quiet corners stay shiny. Eventually, to recoat the whole floor, you have to sand back through the old film.
Hardwax oil soaks into the timber instead of sitting on top. The floor feels more natural underfoot and looks more like real wood, because there’s no film between you and the timber. You do need to wipe up spills quickly, as the surface isn’t as sealed as polyurethane. The big win is that you can fix one spot at a time. If one area gets worn or damaged, you can sand and recoat just that bit, without redoing the whole floor. That’s handy in busy areas like hallways, which would otherwise need a full resand years before the rest of the house.
For Melbourne rentals, polyurethane is usually the better choice. It handles whatever tenants throw at it, and tenants don’t need to know anything special to look after it. For people living in their own home, if the lifestyle suits it, hardwax oil often gives a finish that’s nicer to live with.
If you go with polyurethane, you’ll need to choose between water-based and oil-based. That mostly comes down to colour. Water-based dries clear and stays clear. That’s what you want for light timbers, grey stains and any floor where you want to keep the natural colour. Oil-based goes amber over time, which adds warmth and depth. On darker Australian hardwoods, a lot of people love that. On pale timbers or grey floors, it works against the look you’re going for.
Parquetry and Herringbone Need a Different Approach
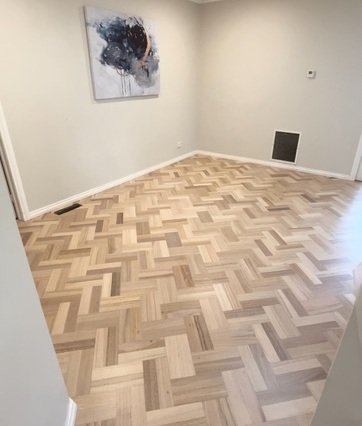
Plenty of Melbourne homes have parquetry floors, especially older places in suburbs like Camberwell, Hawthorn and Malvern. These floors need to be sanded differently from normal boards.
With normal boards, you sand along the grain. The drum sander runs down the length of each board, so it cuts with the grain the whole time.
Parquetry and herringbone don’t work like that. The blocks point in different directions, so there’s no single grain across the floor. If you sand with the grain of one block, you’re sanding across the grain of the one next to it.
The answer is to sand on the diagonal, usually at 45 degrees to the pattern. Sometimes it takes a few diagonal passes at different angles to get an even finish across all those different grain directions. It takes longer and needs more care than a floor of straight boards. The edges are trickier too. The edge sander moves in circles, and on parquetry that can leave marks on the blocks around the edge of the room that show up more than they would on boards.
If a sander quotes parquetry at the same rate as a normal board floor and doesn’t mention any of this, either they haven’t looked at the floor properly or they’re not being upfront about what the job involves.
Get the Timing Right
The two most common timing mistakes on Melbourne floor jobs are sanding too early in a reno and sanding too late.
Too early means sanding before the other trades have finished. Painters, plasterers, carpenters and plumbers all leave marks, drips, dust and mess behind. Sand the floor while the reno is still going and they’ll undo it before you’re done. You’ll either pay for another sand or live with a floor that looks like it was finished on a building site.
Too late means the skirting boards are already back on. The drum sander can’t get right up to the wall, so the edge sander has to do more of the work around the edges. And edge sanding with the skirting already on leaves more visible marks around the room than it does on an open floor.
The sweet spot is after all the wet trades are done but before the skirting goes back on. It takes a bit of planning to hit that window, but it gives you the best result.
If your reno schedule makes that hard, tell your sander. They can plan around it. A good sander will change their approach and be honest about what the result will look like. One who never asks about your reno and just turns up on the day may find the floor isn’t ready for the work they planned.