This article clarifies your queries about soil stabilization and its’ types. The main focus of this article is a specific technique for slope stabilization, i.e., soil nailing.
We shall go through the introduction of soil nailing, its uses, advantages and disadvantages, design criteria, construction methodology, and performance checks. Let us dive into it.

What Is Soil Stabilization?
Soil stabilization is the act of altering a soil’s physical properties to provide long-term, permanent gains in strength. A soil is stabilized by enhancing its shear strength and overall bearing capacity.
These are the three primary methods for soil stability. The first is mechanical, the second is compaction, and the third is chemical.
What Is Soil Nailing?
Soil nailing is a method of ground stabilization. It is a construction technique used to remediate unstable natural soil slopes or unstable man-made (fill) slopes.
Soil slopes are stabilized by driving passive bars (nails) into predrilled and grouted holes. This method is capable of withstanding tensile stresses, shearing forces, and bending moments.
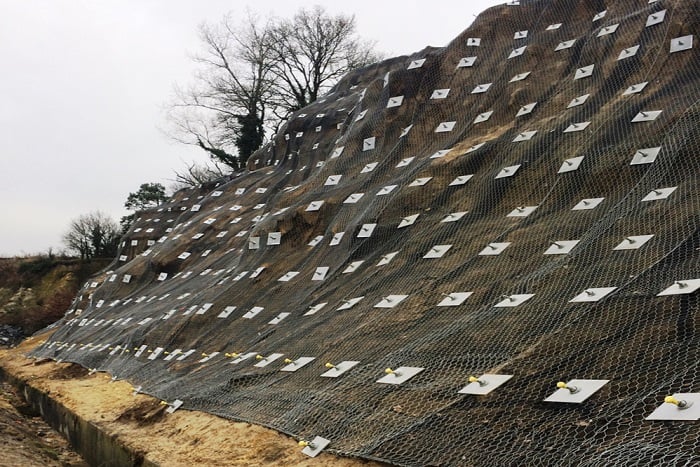
Additionally, soil nailing increases soil stability. It stabilizes slopes, excavations, retaining walls, and other similar structures. The main deciding factor for soil nailing is the characteristics of the ground, the applicability of other systems such as ground anchors, geosynthetic materials, and so on, and the cost. However, it should be established that the slope under consideration is above the groundwater table.
Soil nail walls are generally constructed from top to down. It is called soil nailing because it’s like having a nail being hammered into the soil, where the nails are the steel bars. This technique is generally used to bring soil stability where landslides might be a problem.
The first use of the soil nailing technique dates back to 1972 in Versailles, France. The technique originated from a tunnel construction method called the New Austrian Tunnelling Method (NATM), which uses reinforcing bars drilled into the soil and covered with shotcrete.
Application Of Soil Nailing
- Stabilization of Natural Slopes
- Stabilization of Embankment Slopes
- Stabilization of Cuts
- Retaining Walls
- Tunnels
- Excavation Shoring
- Bridge Abutments
Source: geostabilization.com
Advantages of Soil Nailing
- It can be used on new construction, temporary structures, remodeling process, and to repair the existing wall system with comparative ease.
- Soil nailing helps limit the slopes’ boundaries. Hence more space is available.
- It needs minimum slope preparation for nailing operation.
- No restriction on wall height.
- The construction time is lesser as compared to the traditional slope stabilization method.
- The nails are placed at intervals; hence no need to put shoring throughout.
- The cost is generally lesser than constructing a retaining wall instead.
- It may prevent slope erosion with applied with mesh and shotcrete.
- Less noise, fewer traffic obstructions, and less impact on surrounding areas. Thus environment-friendly.
- This technique is flexible, relatively quick, and easy to install.
- Time-saving, cost-saving, requires less labor.
Limitations of Soil Nailing
- High water table is not a desirable condition for soil nailing.
- Soil nailing is not a good choice for non-cohesive soils, fine-grained soils, highly corrosive soils, and loose granular soils.
- The soil nail density increases with a decrease in the soil’s shear strength. This implies that low-strength soils need more nails for stabilization.
- The use of nails is restricted for permanent long-term applications in sensitive and expansive soil.
- Metal nails will corrode.
- Soils with high plasticity have a higher liquid limit and hence lesser undrained shear strength, which can lead to long-term deformations.
- The soil might be overexposed prior to the installation of the nail.
- Sand and gravel might not be compatible with soil techniques.
- Specialists may be required to design and install the nails.
Types Of Soil Nailing
There are four types of soil nails based on the method of construction.
1. Grouted Nails
As the name suggests, these nails are grouted. The holes for this particular nailing method are bored into the walls or slope face.
After this, nails are hammered into place inside the pre-drilled holes. Later, the hole is stuffed with grouting materials having a water-cement ratio between 0.45-0.6.
In conclusion, the diameter of the nails ranges from 100 to 200 mm, and the distance between each nail is typically 1.5 m.
2. Driven Nails
The driven soil nailing is the process of temporarily stabilizing soil slopes. It is quite a bit quicker than other methods. As it is a temporary method, neither the nails nor the reinforcement steel will be protected from corrosion.
The driven soil nailing method involves driving the nails into the slope face while the excavation is taking place. The diameter of the nail ranges from approximately 19mm to 25mm and is considered on the smaller side. Also, the distance between nails is between one and one and a half meters.
3. Self-Drilling Nails
In the method of self-driven soil nailing, hollow bars are the tool of choice. The surface of the slope has holes bored into it to accommodate bars. The drilling operation is simultaneously accompanied by the injection of grout.
It is more efficient than drilling and grouting before nailing. In conclusion, the self-drilling soil nailing method offers more corrosion resistance to nails than the driven nail method.
4. Jet-Grouted Nails
The Jet-grouted soil nails use jets to erode the soil to create holes in the surface of the slope. After that, concrete is used for grouting the space between the steel bars inserted in this hole. The jet-grouted soil nailing offers excellent protection against corrosion for steel bars (nails).
Design Considerations of Soil Nailing
There are eight points to consider when deciding the feasibility of the nailing technique. Let us discuss all of them.
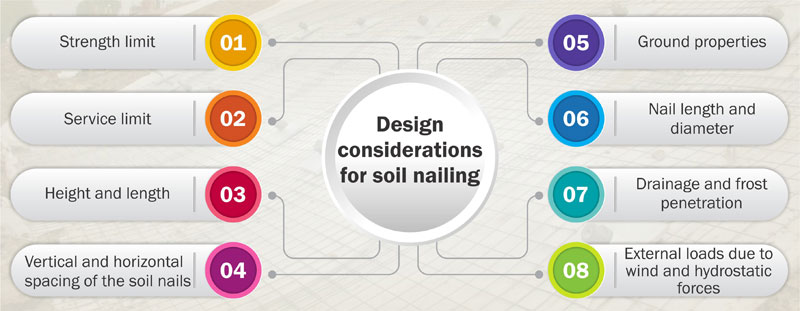
Strength Limit
The first criterion for designing the soil nails is their failure limit. The strength limit defines the limit state of potential failure or collapse.
Service Limit
The second criterion for designing the soil nails is their service limit. The service limit defines the limit state of deformation, which renders the nail unfit for supporting the slope.
Height & Length
The height and length of the slope affect the design. The slope height affects the strength and service limits, while the length affects the cost. Also, higher heights need special installation arrangements like a winch, crane, etc.
Vertical & Horizontal Spacing of Nails
The vertical and horizontal spacing of the nails depends upon the strength and service criteria as well as the soil condition. The spacing between the nail decreases with the decrease in the cohesion of the soils. Hence an increase in cost due to the increase in the number of nails for a given height and length of the slope.
Ground Properties
Soil conditions like density, texture, cohesion, water table, etc., affect the technical and economic feasibility of the soil nailing technique. It affects the nail spacing.
Nail Diameter and Length
After considering all the factors mentioned above, a preliminary assessment of the maximum nail force and length is done.
The length, diameter, and spacing of the nails are the typical factors that govern external and internal wall stability. During the design process, these factors can be altered to fulfill all of the exterior and internal stability requirements.
Drainage & Frost Penetration
The drainage and frost penetration detailing are incorporated into the design in the final stage. These parameters are equally important for the nails to serve for the intended duration.
External Loads due to Wind & Hydrostatic Pressure
Lastly, nails are checked against external loads like wind and hydrostatic pressure. If the design can potentially fail due to the external loads, it is revised accordingly.
Construction Methodology
The construction involves many phases, from excavation to grouting. RJ Byrne and other contributors developed the “Soil Manual for Design & Construction Monitoring of Soil Nail Wall”[5]in 1998. We shall discuss key points from the manual to explain the construction method of soil nail installation.
Excavation
The excavation of vertical cuts and slopes is carried out up to a height that can support itself for 24-48 hours. Ensure the drainage allows surface water to drain out without eroding the soil. The surface should be smooth to minimize the shotcrete quantity.
Drilling Nail Holes
Nails can be installed by directly pushing them into the soil. Alternatively, holes can be drilled using a drill bit machine, rope core drill, air leg rock drill, or horizontal drill machine, and then nails can be inserted in holes.
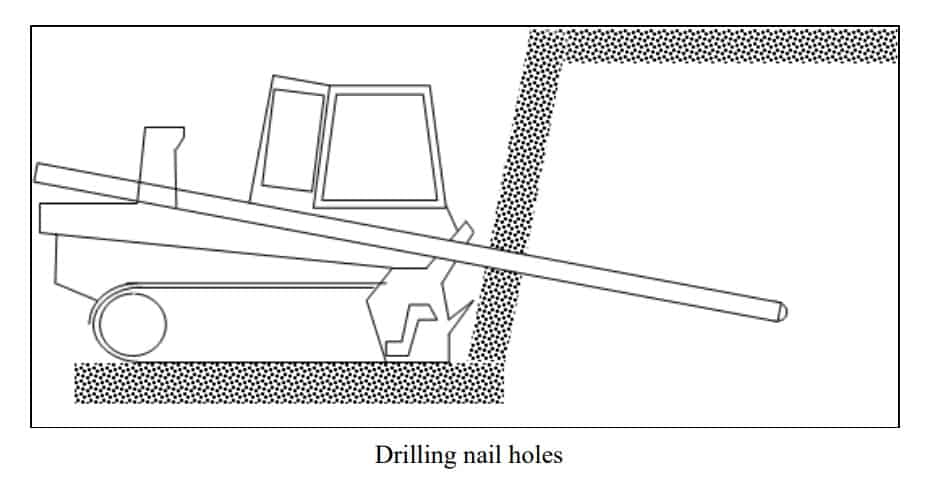
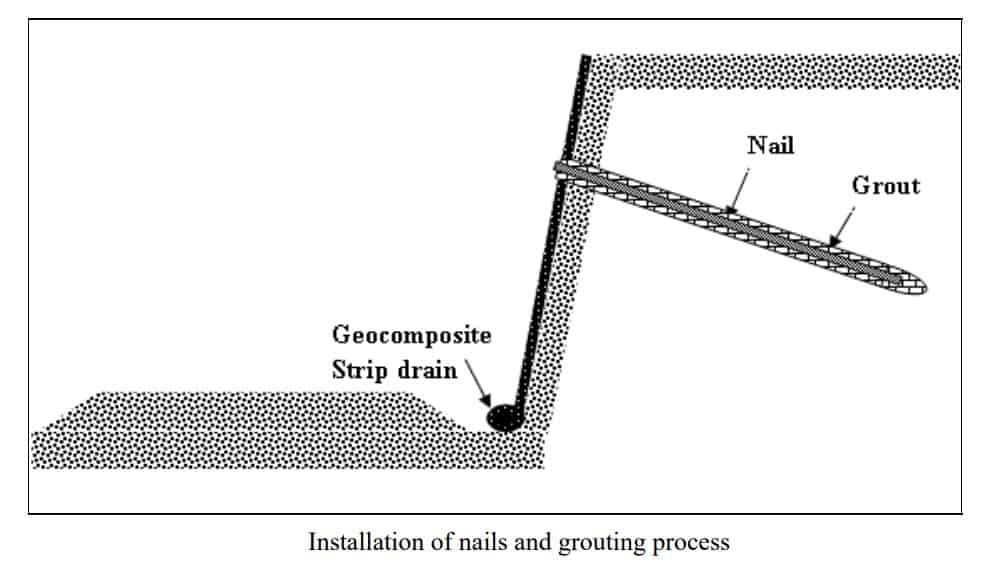
In the second method, centralizers are used to correctly place the nails into the holes, and then the holes are grouted.
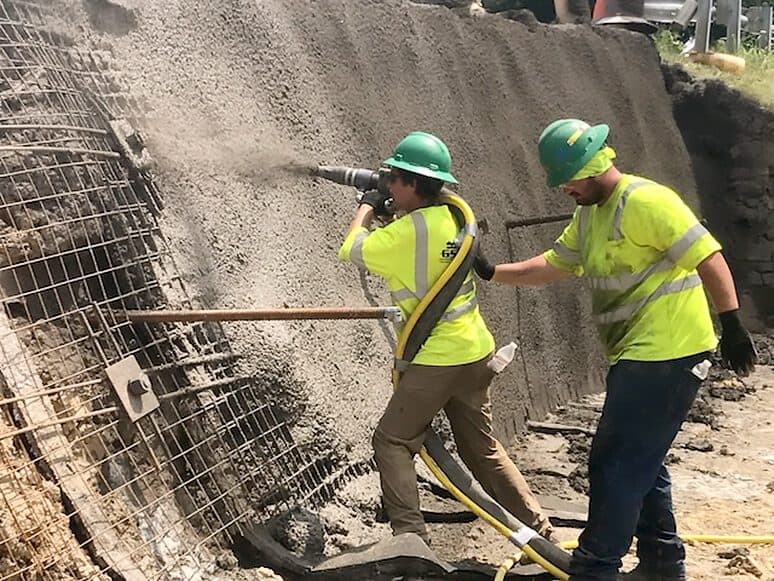
Construction of Temporary Shotcrete Facing
A wire mesh is welded to the nails to support the upcoming shotcrete. A 3-4 inch thick layer of shotcrete is sprayed with a shotcrete gun. The shotcreting can be done by any of the two methods- dry mix and wet mix.
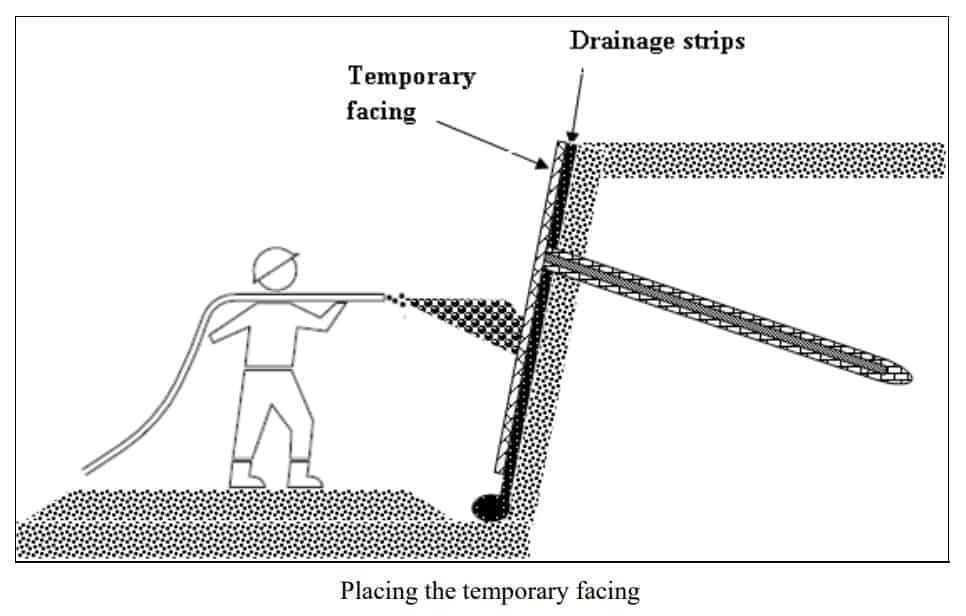
In the dry mix method, the cement-aggregate mix is mixed with water at the nozzle. In the wet mix method, the cement, aggregate, and water are blended and conveyed by a hydraulic pump.
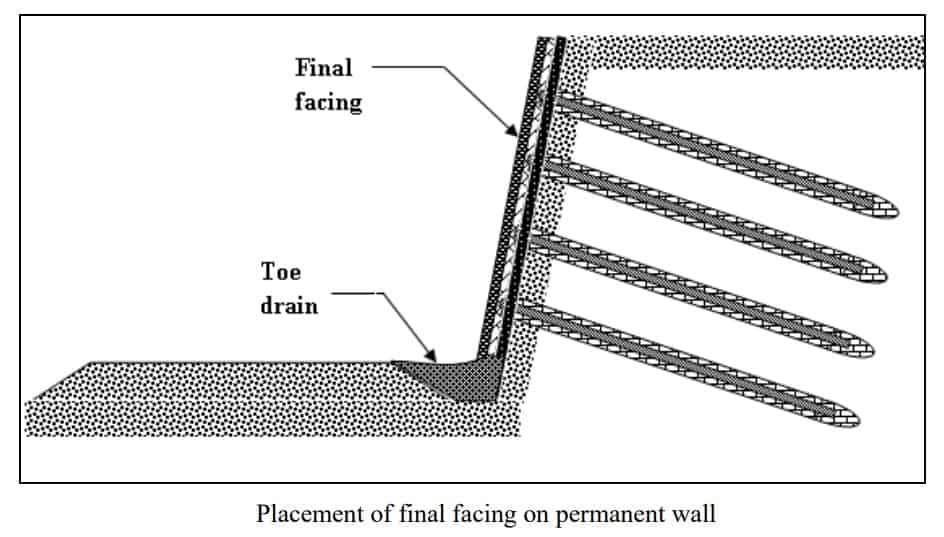
Construction of Permanent Facing
When the bottom of the excavation is reached, a permanent facing arrangement is done. It can be either concrete or shotcrete. A toe drain is connected to the bottom of the slope.
Also Read
Methods Of Soil Stabilization
For More Updates like our Facebook Page and join our Telegram Channel.
khuberam999@gmail.com