Short-duration city work looks simple from the sidewalk: show up, shift a lane, mill a block, cut a trench, tie-in, and get out. In practice, the margin for error is razor thin. Traffic keeps flowing, buses keep stopping, pedestrians still need a safe, direct path, and crews must finish before rush hour roars back.
Here’s the catch: when phasing, lane shifts, and pedestrian detours are planned together—not in silos—crews finish faster, the public stays safer, and complaints stay low.
Here’s what this covers:
- What “short-duration” really means in a city
- Phasing for resurfacing and utility tie-ins that keeps throughput up
- Lane shifts and tapers drivers can read at speed
- ADA-safe pedestrian detours that stay open in real life
- Red flags your work zone is at risk of overruns
The Realities of Short-Duration City Work
In urban corridors, you rarely get a full closure. You get overnight windows, weekend mornings, or midday lulls between peak periods. Every minute counts, and the playbook has to work with buses, deliveries, emergency vehicles, cyclists, and the lunchtime crowd.
The goal is simple: maintain capacity and safe walking routes while giving crews a protected, efficient pocket of space. Sounds simple. It isn’t. That’s why the sequence—what moves first, what never moves, and what snaps back fastest—drives everything.
Phasing That Keeps the City Moving
Phasing should protect the longest-lead activities first and stage equipment so the work face never waits. It should also assume you must return the street to service in a clean, legible condition between windows.
Resurfacing in a 6–8 Hour Window
Think in three passes, each with clear traffic handling:
- Phase 1: Pre-mill setup
Sign the corridor two blocks upstream of work, position arrow boards, stage sweepers and trucks downstream. Install taper and buffer in advance. Relocate bus stops only if boarding conflicts with the work face; if not, marshal a flagger to hold buses through the pocket.
Temporary markings: lay out cones with skip patterns that mimic a centerline to avoid confusing drivers when the lane shifts. - Phase 2: Mill and clean
Roll a moving work pocket: taper, buffer, milling machine, truck, spotter, and sweeper in convoy. Keep the pocket predictable—no surprise merges. If a driveway must be blocked, hold it no more than 10–15 minutes and post a ground guide for exits.
Critical line: For high‑exposure blocks, use traffic barriers to separate live lanes from milling operations. That single sentence saves fender-benders and near-misses. - Phase 3: Pave and reopen
Paving passes should be timed so the last mat cools before the window closes. Bring enough cones and signs to restore a straight, legible path as soon as rollers finish. Sweep joints and post “Fresh Oil” or reduced speed as needed.
Between windows, address utility frames. Mill to a uniform depth, then schedule riser rings and final setting before top course so you don’t leave bike-eating edges.
Utility Tie-ins on a Two-Lane Arterial
Tie-ins often need daytime coordination with facilities and nighttime traffic control. Keep it surgical.
- Precut the trench limits and plate the crossing during the day. Mark plates with high-friction coating and paint the corners so cyclists can see them.
- Night window:
Phase 1: Shift one lane with a full-length advance taper and a shoulder buffer. Station a police detail or certified flaggers at the ends to meter platoons through the single lane.
Phase 2: Open trench, set shoring, complete the tie-in. Keep spoil contained and covered. Maintain a minimum 11-foot live lane unless geometry requires a 10-foot pinch; if so, post advisory speed and place a spotter at the pinch point.
Phase 3: Backfill and plate with countersunk plates, flush with the surface. Set longitudinal joints perpendicular to bike paths where possible. Restore both lanes by the end of the window and post “Uneven Surface” signs if permanent restoration is pending.
If a full cross-street cut is required, convert to short rolling closures of 5–7 minutes with recovery gaps, rather than a single 30-minute hold, to reduce queue spillback.
Lane Shifts and Tapers Drivers Understand
Drivers make split-second choices. Your work zone has to tell a clear story at 30–35 mph.
- Right-length tapers: Use MUTCD guidance for taper length and don’t skimp on the buffer. A clean, consistent cone line beats a fancy sign every time.
- Predictable alignment: Keep the shifted lane parallel to the curb for at least one block. Avoid S-curves; they confuse and slow drivers unevenly.
- Markings that matter: Where the centerline disappears during milling, deploy temporary tape or cone patterns that mimic skips so the path reads at night and in rain. Relight the corridor: portable lights should aim down and away from oncoming traffic to reduce glare.
- Bus stops and loading: If a stop sits inside the pocket, create a curbside pocket behind the taper or stage a supervised curb pull-in with a protected re-entry. For loading, assign a single marshalling point and walk deliveries in.
Safe, Direct Pedestrian Detours (ADA)
Pedestrian plans fail when they ask people to cross the street twice for a one-block detour or thread a maze of cones. Keep it direct, edge-protected, and obvious.
- Stay on the same side: When possible, build a temporary walkway adjacent to the curb using low-profile channelizers and weighted bases. Minimum clear width 4 feet (5 feet preferred). Edges must be cane-detectable and continuous.
- Ramps that work: Any curb ramp must align with the walking path, with slopes under 8.3% and landings that are level and stable. No lip at the plate edges.
- Crossings you’d send your family through: If you must detour across, post a high-visibility midblock crossing with advance warning, daylighted corners (no parking near the crosswalk), and temporary curb ramps. Assign a flagger during peak pedestrian periods.
- Signs where eyes look: Place detour signs at the decision point, not 50 feet past it. Night work needs lit signs or active lighting on the walkway edges.
Signal Timing, Transit, and Freight: The Quiet Multipliers
Good traffic control can still grind to a halt if signals fight your plan. Before cones hit pavement:
- Ask the traffic management center for a temporary timing plan that favors the live lane during the window. Restore the plan at closeout.
- Coordinate with transit on stop relocations, headways, and detours. Share a map with exact temporary stop locations and estimated durations.
- Notify frequent shippers on the block—grocers, parcel services, and restaurants—and assign a delivery window or a staging bay outside the pocket.
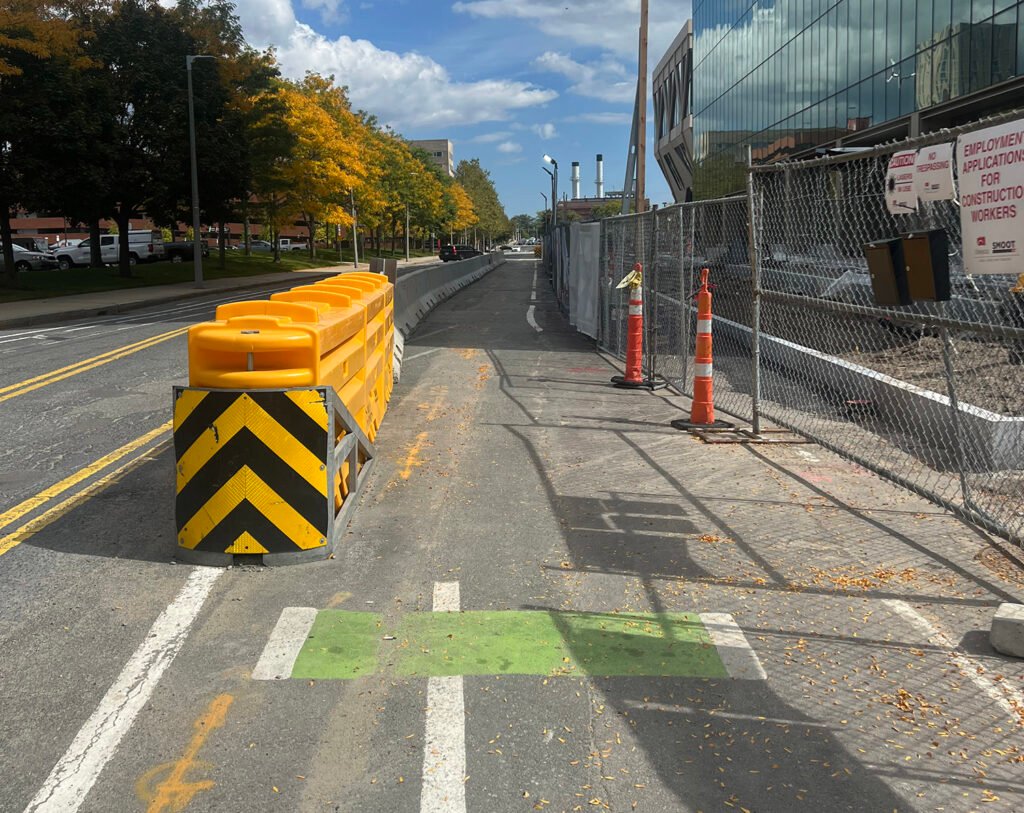
Positive Protection Where It Counts
Urban streets change block to block. Exposure varies with lane count, curves, grade, and sight distance. Use positive protection where the risk spikes.
On high‑exposure blocks, deploy temporary barrier systems to separate live lanes from milling operations. That’s not overkill; it’s what prevents intrusions when drivers misread the shift or rubberneck. Space entries for workers every 200–300 feet and keep barrier ends treated or flared to reduce impact severity.
Communication That Buys You Time
The public will forgive noise and cones if they know what’s coming and see crews moving with purpose.
- 72-hour notices to residents and businesses with dates, times, parking restrictions, and a contact number that gets answered.
- Portable changeable message signs two to three days ahead, then switch messages to “Work Today 9a–3p” on the morning of the job.
- On-site leads in high-vis vests ready to talk to store managers and residents. Answer questions, don’t punt them.
Field Discipline That Keeps Crews Safe
- One person calls moves in and out of the work face. No freelancing.
- Keep a clean site: sweep as you go, keep hoses and cords out of the walkway, and stage cuttings and spoils behind a barrier or out of reach.
- Tools and signs staged in reverse order of removal so you can restore the street fast when weather turns or an ambulance needs priority.
Quick Closeout and Clean Return to Service
- Remove tapers from downstream to upstream so drivers never face a taper to nowhere.
- Pick up cones, then pick up signs. Don’t drag signs into the sidewalk while it’s busy.
- Sweep thoroughly and reset any temporary markings that got pushed.
- If plates remain, pin or recess them, paint the corners, and post a plate sign. Restore parking only after the last device is clear and the curb is swept.
Signs Your Work Zone Is Slipping
- Queues spill back past the advance warning signs within 15 minutes of setup
- Pedestrians walk in the live lane because the detour is blocked or too long
- Flaggers improvise new tapers on the fly
- Crews stop work to wait for materials or tools that weren’t staged
Summary
Short-duration city work lives or dies on phasing, simple lane stories, and pedestrian routes people actually use. Plan for the real street in front of you, not the one on paper. Guard high-risk blocks with positive protection, keep walkers on a direct, ADA-safe path, and coordinate with signals and transit so your lane stays green when it counts. Do that, and you’ll finish inside your window with fewer surprises and a safer corridor for everyone.